Monthly Archives: November 2011

The Most Important Meal of the Day

Well to me, anyway. I know a lot of people don’t like to jump on the breakfast bandwagon, but it is truly the meal I most look forward to every day. That probably speaks more to my obsession with eggs and bacon than it does to any “breakfast as a healthy way of recharging my batteries for the day.” Who cares about the health benefits when there’s bacon, am I right?

Because it is Fall I have also engaged my yearly obsession with pumpkin. Besides pie, various holiday cookies, and other little ways I’ve found to include pumpkin in my cooking lately, I found a recipe for loaves of sandwich bread made with pumpkin puree that is probably the tastiest bread I’ve made in a long while. It makes spectacular toast (especially when you slather some fresh, homemade apple butter on said toast) but I also found that it makes even better French Toast. If you’re looking for a tasty holiday breakfast, this is a perfectly delicious one.

Pumpkin Pie French Toast

  • 4 slices of slightly stale pumpkin yeast bread (about 1/2 inch thick slices is what I used. The linked recipe is easily halved to make one loaf, by the way. It also freezes very well.)
  • scant 3/4 cup whole milk
  • 2 large eggs
  • pinch salt
  • 2 Tablespoons brown sugar
  • 1 heaping teaspoon cinnamon
  • about 1/4 teaspoon nutmeg
  • splash of vanilla

Heat a griddle or a large nonstick pan to medium-low. Whisk together the milk, eggs, salt, brown sugar, cinnamon, nutmeg and vanilla. Soak your bread slices in the custard for about 30 seconds on each side – don’t leave them too long because they’ll get mushy and tear your bread. Melt a pat of butter on your griddle or in your pan and place your soaked bread on the pan a couple slices at a time. If you’re using a full size griddle, you can fit all the slices on it. Cook the bread until golden brown on both sides. Serve with maple syrup and more butter, or sliced fruit if you’d like.

1 Comment

Filed under Breakfast

Cha Siu Is Forever (Chinese BBQ Pork)

Cha siu just out of oven

Cha siu just out of oven

This is a delicious moist pork dish that is really easy to make as most of the time is involved in doing nothing. The version I have made is different from the typical cha siu one might find in a restaurant because I use a fattier cut of pork with more connective tissue but it makes for a more succulent result. I find most cha siu even in the best of Chinese restaurants to be over colored and dry, mainly because they are using a too lean cut of pork like loin or boneless loin ribs. I used pork shoulder. Country style boneless ribs which are over the shoulder area would work well too.

To ensure that the meat will stay moist, the pork was put in a kosher salt and brown sugar brine. It is best if you can brine the meat for at least two hours. After the brine, rinse the meat and pat dry then place in a pan or bowl for marinating. The marinade will be ready after 2 to 3 hours but longer is always better and overnight is best.

The Pork:

  • 1.5 lb. of pork shoulder, cut to about 1.5″ thick slabs. If using country style ribs, they can be left as is.

The Brine:

  • 1 cup of kosher salt
  • 1 cup of brown sugar. White sugar can be used but I prefer the taste of brown sugar and it will affect the meat’s browning later
  • Water to just cover the meat

The Marinade:

  • 1 cup of dark soy sauce
  • 2 Tbsp of rice wine or sake. Sherry or even whisky can be substituted
  • 2 Tbsp of brown sugar
  • 2 cloves of garlic, finely minced
  • 1 Tbsp of hoisin sauce
  • 3/4 Tsp of five spice powder
  • 3 Tbsp of honey, 1 Tbsp for marinade and 2 Tbsp for glaze
  • 1 tsp of annatto seeds, steeped in 2 Tbsp of hot oil (instructions to follow)
Pork shoulder in marinade

Pork shoulder in marinade

I use annatto seeds to get a bit of red coloring for the cha siu instead of artificial food coloring. I hate how cha siu in restaurants look like Mao Tse Tong’s communist red. To extract the color from the annatto, put them in a microwave proof bowl with two Tsp of vegetable oil and heat on high for 30 seconds while keeping an eye on it. The oil should get hot but don’t let it burn. If needed, give it a bit more time in the micro. Carefully take out and let it cool. The seeds will give up their color. When cool, strain the seeds out and pour the oil into marinating container and add all marinade ingredients.

Stir marinade well, if needed, put in microwave for 30 seconds to help honey to incorporate into the rest of ingredients. Place meat in pan, turn to coat all sides and spoon marinade over meat well and place in refrigerator. Repeat this process occasionally during the marinating process.

Take meat out of refrigerator at least half hour before cooking and preheat oven to 325ºF.  Place meat in roasting pan or porcelain casserole on middle rack in oven. Brush or spoon 1 Tbsp of honey over meat and bake for 20 minutes. Brush or spoon 1 Tbsp of honey over meat. When time is up, turn meat over and apply honey to other side of meat and bake for another 20 minutes. When time is up, crack oven door open and turn heat to broil to get a nice char on the corners of the meat and really set the glaze for about 5 minutes. Flip the meat and do the same to the other side. When done, remove from oven and let rest for at least 10 minutes. Slice thin and serve as desired.

Sliced thin

Sliced thin

This time, I used the cha siu in egg noodle soup in a hu tiu broth I made from pork neck bones, dried shrimp, dried squid, ginger, onion, cloves, star anise, fish sauce and brown sugar.

Noodle soup with cha siu

Noodle soup with cha siu

Noodle soup with cha siu

Noodle soup with cha siu

Other ideas for using cha siu:

  • Over steamed rice or sticky rice with chopped green onions and cilantro
  • In egg noodle soup or hu tiu noodles
  • Over braised noodles (lo mein)
  • In spring rolls with rice paper, rice vermicelli, bean sprouts and garlic chives

Enjoy!

5 Comments

Filed under Meat

Grandma’s Pâté Chaud

These little French inspired Vietnamese savory pastries are one of my favorite comfort foods. I can’t remember a time when I had not eaten them so my first taste must have been from a very very young age. In Saigon, we ate them as snacks, for breakfast or sometimes for lunch with Hu Tiu (pork and seafood rice noodle soup — a sort of less well known cousin to the famous pho). I can’t believe that in all my life, this is actually the first time I made them. Being in San Jose, it is just so easy to buy them from any Vietnamese eatery or deli. Having said that, making them from scratch with what I remember of grandma’s pâté chauds results in a much better, moist and more flavorful little bite. Besides, store bought products lack the myth or heritage…

The Pastry:

I just use round Pepperidge Farms frozen pastry shells. You can find them in any supermarket. They are pretty good for frozen pastry. I can’t be bothered to make them from scratch because of time and because I completely suck at having to measure accurately for any baked products except for bread and pizza dough.

The Filling:

  • 1 lb of pork shoulder or ground pork. (You can use beef too but I prefer the texture and the way pork fat in the shoulder cut minces and keeps the filling moist.)
  • 1 egg yolk (To be used as a binder in the filling)
  • 1 egg, beaten with 2 Tbsp of water for wash on pastry
  • 1/2 medium yellow onion, finely diced
  • 2 medium to large crimini mushroom, finely diced
  • 1 large piece of woodear fungus, soaked in hot water, julienned and chopped fine
  • Garlic powder (I use powder to reduce the amount of water in filling)
  • 1 to 2 Tbsp of fish sauce
  • Kosher salt
  • Fresh cracked pepper
  • Five spice powder

Preheat oven to 425ºF

I made these with pork shoulder meat that I sliced thin then hand minced myself. It is a little more work but the texture is definitely better than machine ground pork. Also, I just like using knives! Mince the pork until it is fine and has the texture of steak tartare.

Mincing pork shoulder

Mincing pork shoulder. Fun!

Fold in all other ingredients and mix well before adding the egg yolk. Make sure the yolk is incorporated well into the meat filling. Set aside in cool place but don’t refrigerate, the filling should be at room temperature to ensure it cooks properly without taking too long and burning the pastry shells.

Take the pastry shells out of freezer and place on an ungreased baking pan (they have plenty of butter in them so no need). Place in oven and bake for about 12 minutes. The pastry needs to rise enough so that you can take the tops off of them and fill with meat but not so brown that they will burn by the end of cooking. You will have to gauge depending on your oven.

Remove pastry shells from oven and carefully take the tops off and take out the pastry in the center to make room for filling. Spoon in the meat filling and fill each pastry shell well. The meat will shrink so don’t be afraid to pack it in, just don’t tear the shells.

Filling pastry shells

Filling pastry shells

Once all filled, replace the tops of the shells and brush with egg wash. Be sure to get tops and sides well, it will help them turn to a golden brown nicely.

Put back in oven and bake for another 10 to 14 minutes. Again, you will have to take a peek and make sure the pastry doesn’t overcook and burn. The filling will cook fairly fast. When you insert a bamboo skewer in the meat and it comes out clear it is done. Remove from oven and cool.

Pâté chaud just out of the oven

Pâté chaud just out of the oven

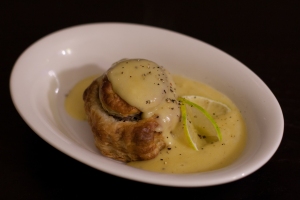
For this meal, I plated the pâté chaud in a boat dish and poured some cream of leek potato parsnip soup (I’ll cover the soup in another recipe) over it with a touch of fresh lime juice to cut through the richness.

Pâté chaud smothered in cream of leek potato parsnip soup

Pâté chaud smothered in cream of leek potato parsnip soup

Enjoy!

Leave a comment

Filed under Baking, Meat

A Warming Dinner: Braised Pork Rib Tips and Potato Parsnip Gratin

For a cool autumn night, this dish just hit the spot with the warm creamy goodness of the gratin and the spicy warmth of the pork rib tips. Instead of making the usual potato gratin, parsnips were added for a nutty flavor. For the rib tips, they were braised in a liquid that was on the sweet side after being rubbed with a spice mixture then seared but finished off with a homemade BBQ sauce that had a bit of heat and smokiness to it. It created another layer of flavors for the dish.

This meal was portioned for two people since Laura is here but can easily be done for just one.

The Rub:

  • Kosher salt
  • Freshly ground cumin
  • Freshly ground coriander
  • Smoked paprika
  • Ground New Mexico chile or any other medium heat pepper
  • Freshly ground black pepper

The Braise:

  • 1 to 1.5 lbs section of pork rib tips (This was bought at an asian market. You might have to ask butcher at a supermarket or just go to a good butcher.)
  • 1 medium yellow onion, sliced thick to about 1/4″
  • 1 medium Bartlett pear, diced into 3/4″ chunks
  • 4 cloves of garlic, crushed
  • Apple juice or cider, enough to go up halfway on the ribs when in pan

The BBQ Sauce:

  • 1 – 1.5 cups of apple juice or cider
  • 1 – 1.5 Tbsp Rice wine or cider vinegar (check to fit your taste)
  • 3 – 4 Tbsp of ketchup
  • 1 tsp of Worcestershire sauce
  • Ground New Mexico chile to taste (I used about 3/4 tsp)
  • 1/2 tsp smoked paprika
  • 2 tsp honey
  • 2 tsp brown sugar
  • 1/2 tsp fennel seeds
  • Freshly cracked pepper

The Gratin:

  • 2 Yukon gold potatoes
  • 2 medium sized parsnips
  • Kosher salt
  • Freshly cracked pepper
  • 1 cup of heavy cream (or enough to just almost cover the potato and parsnip)
  • 1 cup of grated parmesan cheese
  • 1/2 cup of grated munster or other good melting cheese like gruyere or fontina(don’t use cheddar, it clashes with parmesan)

Preheat oven to 400º

Peel the potato and parsnip and boil until just cooked. It is important not to over cook. Drain and let cool then slice into 1/4″ slices. Slice the parsnip at a bias to get larger surface area.

Lay the potato and parsnip in a gratin or shallow casserole pan. Season with kosher salt and fresh cracked pepper well. Pour heavy cream into pan and sprinkle cheeses evenly over the top. Bake in oven for about 20 minutes.

*Note, start gratin about 5 – 10 minutes before searing ribs.

Using an oven safe fry pan just large enough to hold the ribs and the vegetables, sear the ribs well with olive oil. Also sear the sides and ends of the ribs if you can. The rub will char quickly so keep an eye on the meat. When all sides have been seared, add apple juice, onion, garlic and pear into pan. Cover pan with foil and place in oven.

When gratin is done, remove from oven and keep warm and loosely covered with foil. Lower oven to 300º. The ribs will take about 45 – 50 minutes from start to get tender.

Potato & Parsnip Gratin

Gratin just out of oven

Start the BBQ sauce, put all ingredients into a small saucepan and set heat to medium. Bring the sauce to simmer, stirring frequently and taste to your liking. Adjust as needed. Simmer the sauce until it thickens up. About one third of the liquid will evaporate when done. Turn off heat but keep warm. Sauce will thicken considerably.

When ribs are done, remove and rest covered in foil for about five minutes.

Rib Tips

Ribs after resting

Separating ribs

Cutting ribs apart

Place pan on stove top on high heat and reduce braising liquid until there is about 1/4 of volume remaining.

Reducing braising liquid

Reducing braising liquid

Plate ribs over onion and pear and spoon reduced braising liquid over meat. Drizzle a bit of the BBQ sauce over the ribs and remaining in a circle around near edge of plate. Have fun with the contrasting sweet and spicy sauces.

Braised Pork Rib Tips

Serve gratin into small boat dishes, crack more fresh black pepper over it. If desired, zest some lemon over gratin for another layer of flavor.

Potato & Parsnip Gratin

Enjoy!

Leave a comment

Filed under Meat, Starch

Dessert for One

It’s difficult to pare down most dessert recipes. If you’ve got a raging sweet tooth but you live with someone who doesn’t share your intense passion for sugar, it can be hard to keep non pre-packaged sweets around to satisfy you. Sometimes the sweet tooth wants a sugar bomb to sate it. But when you want something subtly sweet that is also creamy and just plain satisfying to eat, rice pudding fits that bill very well. This is a very abbreviated version of rice pudding, made creamier than usual by using naturally starchy sushi or risotto rice in place of white long grain. The piloncillo sugar in this recipe provides a sort of caramelized flavor to the pudding. There is a barely there sweetness to this dessert that pairs well with the slight zing of the citrus zest and the dried, lightly tart cranberries. If you’d prefer a sweeter rice pudding, feel free to drizzle some honey along with the dusting of cinnamon. The great thing about rice pudding is you can substitute pretty much anything that pleases you. Want to use all white sugar? Go for it. Raisins instead of cranberries? Fine with me. Rice pudding, in addition to being delicious, is a great blank slate to play with.

Rice Pudding for One

  • ¼ cup sushi rice (or risotto rice would work fine)
  • approximately 2 ½ cups whole milk (depending on how tender your rice is after only 2 1/2 cups. I live at 6200+ altitude which usually means I need to add more liquid to rice when I cook it. Also, use the whole milk. Please don’t substitute skim or 2% unless you like watery rice pudding.)
  • 2 Tablespoons grated piloncillo (or brown sugar if you can’t find a piloncillo cone)
  • 1 Tablespoon or so white sugar
  • pinch salt
  • 1 Tablespoon lemon or orange zest
  • 2 Tablespoons dried cranberries

In a pot, combine the rice, milk, piloncillo, sugar, salt, and cranberries. On medium heat, begin cooking, stirring occasionally, until the rice is tender and begins to thicken into a creamy, pudding-like consistency. Serve warm or cold, with a sprinkle of cinnamon on top and honey if you want more sweetness.

Leave a comment

Filed under Dessert

Spicy Yakitori Wings with Honey Lime Sauce

Laura had been craving chicken wings with crispy skin in the two months since she was back in Scotland and I had not made any since she returned so last night I threw together a quick meal with a variation I had not done yet. I wanted the wings to have the crispy skin she likes but we didn’t have the time to do anything elaborate so I simply made a dry rub and tossed the wings in a big bowl then grilled them slowly over a charcoal fire in my Japanese konro grill.

Yakitori wings on konro grill

Clay konro grill

Spicy crispy skin wings

Spicy crispy skin wings

The wings:

  • Six chicken wings, broken down. Wingtips reserved and frozen for stock.
  • Kosher salt
  • New Mexico chile powder (medium heat)
  • Smoked paprika
  • Brown sugar
The sauce:
  • Fresh lime juice
  • Honey
How:
Fire up grill and let charcoal come to hot coals. There should be a layer of white as on glowing coals and no smoke. Adjust the vent so that it is about a medium to medium high heat. If using a gas grill, adjust heat setting accordingly. The key is not have grill too hot as it takes time for the skin to dry out then get crispy.
Rinse wings under cold water then pat dry well. It is important for the wings to be as dry as possible. If time allows, put wings on tray uncrowded and refrigerate for 15-30 minutes uncovered. The cold dry air in fridge will help dry out the skin and contribute to a crispy skin.
Take wings out and put in large metal mixing bowl and sprinkle on one dry rub ingredient at a time. Toss the wings in bowl to evenly coat each ingredient before adding the next so there aren’t clumps. The rub doesn’t need to stay on the wings for a long time. Fifteen minutes is fine or even less time if you are in a hurry.
Grill the wings for about five minutes on each side, turning after they have a chance to take on color. The brown sugar will help wings caramelize quickly. They should take about 15 minutes per batch. Let wings rest for five minutes before serving. If desired, wings can be served on a bamboo roll for soba to keep the skin from getting soft on plate (from steam).
To make the dipping sauce, squeeze plenty of lime juice into some honey and microwave for 15 -20 seconds if need to help emulsify. The acid and sweetness of the sauce will contrast nicely agains the salty spicy wings.
Enjoy!

Leave a comment

Filed under Grilled

Hello world!

Welcome to A Feast For One!

Join us in our adventures in creating delicious balanced meals that are designed for one. No more excuses for getting fast food or takeout and Rachael Ray has NOTHING on us.

Leave a comment

Filed under Uncategorized